

How To Remove Wire Nest Outdoor Iq Camera
How to Install Nest Cameras Indoors and Outdoors

Google Nest has 4 awesome cameras that livestream footage from inside or outside your home. Whether this is your kickoff camera installation or one of many, we've laid out installation instructions for Nest's indoor and outdoor cameras.
How to install a Nest Cam
Practise you have your Nest photographic camera ready? Click on one of the links below to jump to installation instructions for your photographic camera.
-
How to install a Nest Cam Outdoor
-
How to install a Nest Cam IQ Outdoor
-
How to install Nest Cam Indoor and Indoor IQ
How to install a Nest Cam Outdoor
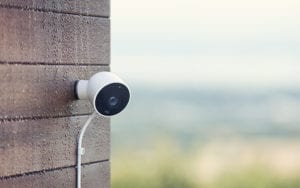
Nest Cam Outdoor cameras are awesome additions to your abode security or surveillance system. They have fantabulous nighttime vision and powerful livestreaming features similar motion detection and two-way sound.
Here'due south what yous'll need to start installing your Nest Cam Outdoor.1
- A strong Wi-Fi point (ii Mbps upload speed or higher)
- A mobile device with the Nest app installed
- An active Nest account
- An indoor or outdoor power outlet
- A power drill with Phillips commuter bit or standard Phillips screwdriver
1. Pick an installation spot
Before you get started with installation, figure out where y'all want to put your new Nest camera. Avoid areas with direct sunlight or plants that might cake the moving picture.
Brand sure your photographic camera tin still receive a signal from your domicile router as well. Nest recommends finding a spot near 7 to x feet off the ground for the best results.
Your Nest Cam Outdoor doesn't take batteries, then it needs to stay plugged in at all times. Find an outdoor plug with a embrace or choose a spot where a string can accomplish indoors. Like the Nest Cam IQ, you can drill a hole into your firm and feed the cord through that.
2. Plow on and actuate your photographic camera
Once you've picked a location for installation, become started by activating and registering your photographic camera.
You'll demand to take the Nest app and your account login. Follow the instructions on the app to add your new camera to your Nest account. The camera's livestream goes straight to the app, and so y'all tin can cheque the moving picture quality and test the camera out before installing information technology.
3. Take it exterior
When you see live footage on the Nest app, your Nest Cam is ready to become outside.
Take your Nest photographic camera outdoors and plug it into an outlet within. Exist sure information technology can still livestream from the location you've picked. You'll demand a stiff Wi-Fi connection for the all-time experience with a security photographic camera like Nest.
If you can't meet a livestream from the camera on the Nest app, you lot may demand to pick a spot closer to your router or move the router closer to the camera.
iv. Install the mounting magnet
Your Nest Cam uses a super strong magnet to stick to the wall mount. Start by marking pilot holes on the wall or post where you'll install the camera. Use wall anchors and masonry drill bits if yous're mounting your camera to brick or stone.
Secure the mounting plate to the wall with 2 of the included screws.
5. Add the camera
Once the mounting magnet is deeply placed on the wall or postal service, place your photographic camera on the magnet. You can adjust the angle by looking at the livestream from the Nest app. Exist sure information technology's in a spot with a clear view, gratuitous from direct sunlight, plants, and structures that might block the picture.
6. Plan your wiring path
Your Nest camera needs to be plugged in at all times, so be sure your cable tin attain an outlet comfortably. You'll take about 10 feet of cable to piece of work with and cable anchors to keep the string from coming loose.
Nest recommends leaving a piffling slack on both ends of the cablevision to provide enough cabling to achieve. We recommend hiding the cable or keeping it high on the side of your business firm to preclude tampering. Outdoor plug covers can protect your outlet and the cable within.
7. Mountain the ability adapter and secure the cable
Install the weatherproof adapter effectually xviii inches off the basis and flush confronting the wall. Use one of the provided screws to secure the wall plate and so snap the adapter to the wall plate.
Side by side, secure the cable with the provided cable clips and screws. There are 9 clips in the Nest kit—apply as many as you demand to go along the cable secure.
Secure the cablevision in a subconscious or out of reach spot to avert tampering. You tin pigment over the cable to cover-up information technology also.
Once you've finished installing your Nest Cam Outdoor, check the livestream and make adjustments for the best picture.
How to install a Nest Cam IQ Outdoor
The Nest Cam IQ Outdoor camera has a 4K sensor that provides a crystal articulate picture in broad daylight or the middle of the night. Its 12x digital zoom is powerful enough to capture license plates and faces from far abroad. It's also easy to set. Follow these installation instructions to get your Nest Cam IQ Outdoor upward and running.ii
Here's what you'll need to get started.
- A strong Wi-Fi connexion (with at least 2 Mbps upload speed)
- The Nest app and account
- An indoor power outlet
- A ability drill with Phillips scrap
Optional, but recommended from Nest:
- three/32-inch drill bits for pilot holes
- 7/32-inch drill $.25 for wall anchors
- ½-inch drill $.25 for cable pigsty
- Caulk to seal the wall plate
- A ladder if you're installing higher on the wall
1. Choose an installation spot
Earlier you lot choice upward a drill, scout out a good spot to place your new Nest Cam IQ Outdoor. The ability cablevision for the IQ Outdoor camera is 25 feet, so measure out this altitude before doing any installation.
It volition need to be close enough to your router to receive a Wi-Fi indicate and an indoor plug to get power. Information technology besides helps to plan your cabling path earlier starting installation.
Look for a spot that won't be blocked past trees, bushes, or direct sunlight. The side of your garage, near a gate, or near your back door are all good places to showtime.
2. Actuate Nest Cam IQ Outdoor camera and add it to your Nest business relationship
Start inside your house past plugging your Nest Cam IQ Outdoor camera into an outlet and adding information technology to your Nest business relationship.
Download the Nest app and log in using your account data. Follow the instructions to add your new camera to your business relationship. You'll know the camera is upwardly and running by the live video feed in the app.
three. Accept it outside
Keep your camera plugged in and accept information technology where you want to install information technology. Check the live feed to see how the Wi-Fi connection holds upwards. If the video starts lagging or freezing, the connection may not be strong enough for reliable footage.
You can cull a new spot for installation or movement your router closer to where you want to install the camera.
four. Mount the wall plate
The Nest Cam IQ Outdoor has a wall plate with a hole through the centre for the ability cable. You tin either drill through your outside wall and run the cablevision through or lead the cable around and into the plate. This pace is why planning a cablevision path beforehand is so of import.
The good news is either option works. If you lot're drilling into brick or stone, you'll need a masonry drill scrap and the wall anchors included with your camera.
Once yous've picked a spot, use the wall plate to marker where to drill. Use a iii/32-inch drill bit to create pilot holes for the wall plate. If you're using wall anchors, choose a 7/32-inch bit for the wall anchors.
Seal the plate with caulk, leaving a small gap for h2o to bleed.
If you're drilling through the wall, identify the wall plate over the hole and route the cable through. If not, route the cablevision through the indented infinite on the wall plate for the string to connect to the camera.
Nest has a helpful video to show you how this step is done.
5. Add the camera
In one case the wall plate is in identify, you can add together your Nest Cam IQ Outdoor photographic camera. Plug the cable into the dorsum of the camera and click it into place on the wall plate.
When the camera receives power, it will connect to your Wi-Fi and you'll exist able to encounter video feed through the app. Arrange the camera to meliorate the movie.
half dozen. Secure the cable
After yous've positioned your camera, secure the cable. The Nest Cam IQ Outdoor comes with 8 cablevision clips y'all can use to concur the cable to an inside or exterior wall. Use as many as you need.
For a neat cable path, follow a ledge or corner with your clips. Yous can pigment over the cablevision, but we don't recommend painting the camera itself.
7. Exam your photographic camera
Finally, brand adjustments equally needed to your camera's position or its cable. Check the camera'south two-fashion audio, zoom, and action tracking to make sure all its features piece of work.
How to install a Nest Cam Indoor and IQ Indoor photographic camera
The Nest Cam Indoor and Nest Cam IQ Indoor cameras have the same installation steps. It just takes a few minutes and most of the setup tin be done on your telephone.3
Here's what you'll need to get started.
- Nest Cam Indoor or Nest Indoor IQ camera
- The Nest app (for tablet or smartphone)
- An indoor outlet
- Wi-Fi network with ii Mbps upload speed or higher
1. Download the Nest app and annals
Starting time your Nest camera installation past downloading the Nest app onto your phone or tablet. The app works for Android devices 5.0 and upward and iOS devices 12.0 and later. In one case the app is on your device, open it upwardly and sign in using your Nest account login.
two. Plug your camera in
Now it's time to power up your Nest Indoor camera. Both the IQ and standard indoor cameras can stand up on their own. And then plug the power cord into the camera and the wall, and go out the camera on a stable surface while you're installing it.
The Nest cam will chime when it starts up. If yous take the Nest IQ Indoor camera, you'll likewise run into a blueish ring of light around the lens.
3. Add your camera to your Nest business relationship
Sign in to your account if you lot aren't already in. Once you lot've logged in, tap the plus sign to add your new device. If you already have Nest products on your business relationship, tap the Settings icon, and observe Add Product to proceed.
From here, the app will ask you lot to scan the QR code on your new photographic camera. Line up the QR lawmaking with the greenish box in the app so it tin can read it. This doesn't have to be perfect, but it helps to practise this step in a well-lit area without shadows.
4. Proper noun your camera
Side by side, name your camera to reflect its location. The app will provide a few popular options like "living room" or "kids' room" that you lot can choose from.
The name y'all assign your Nest Cam Indoor or IQ Indoor volition appear when the camera sends notifications to your phone. So cull a proper name that makes sense to you.
five. Connect to your home Wi-Fi
Now information technology'due south time to connect your camera to the home Wi-Fi. The app volition lead you to this footstep once you lot've named the location of the camera. Find your home network and type in the password.
six. Place your camera and make adjustments
Once your camera is connected to your home Wi-Fi and the Nest app, you're done! Bank check the Nest app to run into what the photographic camera sees and put it into position. Both the Nest IQ and standard Nest Cam Indoor have broad views, allowing them to see nigh of a room and make out people's faces.
Avoid placing your camera in straight sunlight or facing out the window. This can distort the picture. While making adjustments, try zooming in and looking for obstacles in its path.
Finally, test the video stream to make sure the film captures what you lot want to come across.
seven. Optional: Mount your photographic camera
This is an optional stride, but you can mount the indoor camera to the wall of the plant nursery, hallway, or anywhere you'd like. You'll but need a Phillips screwdriver or power drill with a Phillips chip. If you're installing your camera onto a hard surface like brick or stone, y'all'll need a masonry drill bit.
- Test the Wi-Fi connection on the wall offset. Y'all'll desire to make sure the camera has a good connection before mounting information technology to the wall.
- Marking holes on the wall with a pencil using the wall mount so you know where to place the screws.
- Use the two included screws to mount the plate to the wall.
- Place the photographic camera on the wall mount, and you lot're done!
Nest Camera Installation FAQ
No. Unfortunately, you'll need to keep the camera plugged in at all times for it to piece of work. If the wire disconnects or is cutting, you'll become a notification on the Nest app that the camera has lost ability.
Google Nest has standard and premium cameras for indoors and outdoors. The Nest IQ cameras come with premium features like facial recognition, person alerts, and deject storage. Learn more than about the whole family of Nest cameras in our review.
For indoor cameras, find a stable surface like a bookshelf, tabular array, or countertop. Avert placing your photographic camera in straight sunlight, because it could overheat. You should examination the picture before using the camera to make certain nothing is blocking the lens.
For outdoor cameras, choose a spot out of direct sunlight or abroad from vegetation that could block the lens. And while the outdoor cameras are weatherproof, it'south smart to find a spot with some overhang to avert snow and rain from blocking the view. The garage, side paths, back yard, and front porch are all adept candidates for your new Nest camera.
If you're installing a Nest Cam Outdoor, your router may be likewise far away or the home Wi-Fi bespeak might not exist strong enough. Attempt moving the router closer to the camera or choose a spot outside closer to the router.
If you already take Nest products, they could be overtaking the signal from your new device. Identify the new device closer to the old i or the router. Usually, the app volition prove guidance if this is the trouble.
If you're still having trouble pairing your Nest camera with your home Wi-Fi, visit our Nest camera troubleshooting article or Google Nest's help page for more information.
Recent Manufactures

Dorsum To Elevation
Source: https://www.safewise.com/blog/how-to-install-nest-cameras-indoors-and-outdoors/
Posted by: thompsonwhirds.blogspot.com
0 Response to "How To Remove Wire Nest Outdoor Iq Camera"
Post a Comment